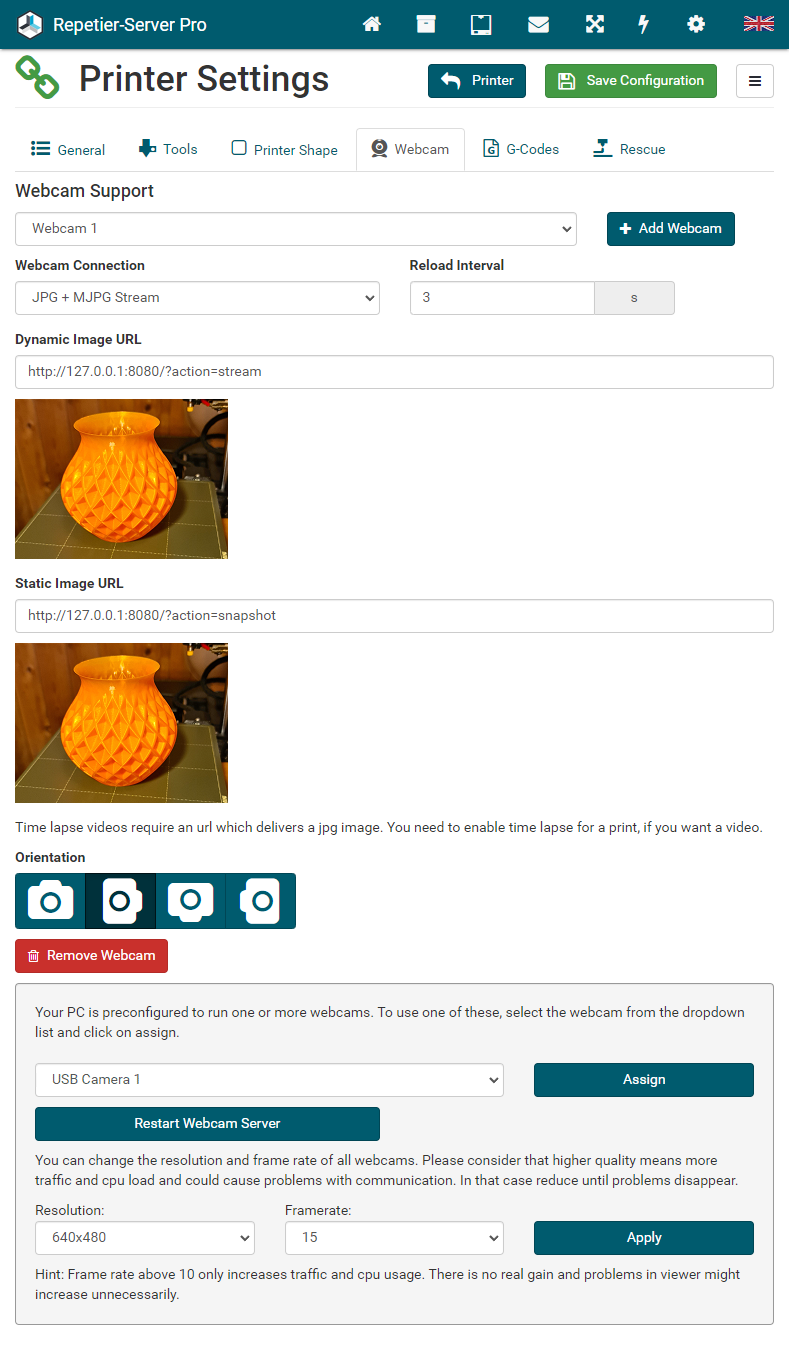
To use a webcam inside Repetier-Server, you need to stream the data as JPG or MJPG. You can use special IP webcams or a simple software, turning your webcam into a streaming webcam. Feel free to use other software as the one described here.
Stream with MJPG-streamer
Here you find a detailed description how to install MJPG-streamer. The description is valid for debian jessie, but should work on other current distributions as well. This solution will install MJPG-streamer such that it automatically starts a server when you insert a webcam and even starts a second instance if you add an extra webcam. Last nice thing about this installation is that since Repetier-Server version 0.80.1 the server will recognise the webcams and offer them in a dropdown list for simple assignment.
1. Install build dependencies
sudo apt-get update
sudo apt-get install libjpeg8-dev imagemagick libv4l-dev v4l-utils make gcc git cmake g++ libopencv-dev
2. Download MJPG-streamer
git clone https://github.com/jacksonliam/mjpg-streamer.git3. Open directory
cd mjpg-streamer/mjpg-streamer-experimental/4. Build MJPG-streamer
cmake -G "Unix Makefiles"
make
5. Install MJPG-streamer
sudo make install6. Run MJPG-streamer as background process
Now it is time to install our special start and watch scripts.
sudo su
cd /usr/local
wget http://download.repetier-server.com/files/server/extras/mjpgstreamer-init-debian/Repetier-Setup.zip
unzip Repetier-Setup.zip
cd Repetier-Setup/etc
nano webcam.conf
7. Configure MJPG-streamer
Then edit the configuration to your situation. Especially set IS_PI to no if the board is not a raspberry pi. If set to yes it also watches for a special pi cam and that will fail on non pi systems. The last 3 lines should match where you installed mjpg_streamer and should match if you followed the instructions. Frame rate and resolution be changed if you think it is required. But keep in mind that larger images and higher frequencies mean more traffic and that can get a problem. So check if images get submitted with only small delay. If delay builds up you will get problems and should reduce traffic. Also note that some usb webcams do not support mjpg – these are supported but then the boards needs to compress images to jpg increasing the load. So best is to avoid these webcams or use them with low resolutions only. Once you are satisfied with the setup, store configuration and proceed:
cd ../bin
chmod 755 installWebcam2
./installWebcam2 install
Now installed webcams are running and can be viewed. Raspi-webcam is reachable over port 9000 while the usb webcams are reachable from ports 8080… in order of detection. If you use identical webcams you might want to edit ../etc/webcam.conf to detect webcams by path instead of id. Just remember then to always use the same port or it will create a new webcam port. Once assigned ports do not change. To reset port assignment remove ../etc/webcam_ports and restart all webcams. Ports will change by doing this!
8. Get ip address
After installing the MJPG-streamer you need to get the local ip address of the server. With ip addr you find your ip address in such a line:
inet 192.168.2.3/24 brd 192.168.2.255 scope global eth0Here your ip address would be 192.168.2.3.
9. Enter the URLs in Repetier-Server
If you are using Repetier-Server 0.80.1 or higher just restart the server and the webcams can be selected in webcam configuration. If the mjpg server is on a different server then Repetier-Server, then you have to enter the network ip and port. Replace port by th eone of the webcam you want.
These are the required URLs (replace <ip address> with your ip address):
Dynamic Image URL: http://<ip address>:8080/?action=stream
Static Image URL: http://<ip address>:8080/?action=snapshot
In Repetier-Server open your printer and go to Printer Settings Webcam.
Select the desired webcam connection (JPG Images, MJPG Stream or JPG + MJPG Stream).
At Reload Interval you can enter the polling interval for new images.
Enter your URLs in Dynamic Image URL and in Static Image URL and click Save Configuration.


